Mario Carrion


Disclaimer: This post includes Amazon affiliate links. Clicking on them earns me a commission, which does not affect the final price.
I mainly use Neovim for software development and writing, and I depend on widely available plugins to help me stay efficient and productive. Because of that, I must stay informed about these plugins’ various releases and features, mainly when they receive updates or are no longer maintained. The reason for this post is twofold: replacing a plugin that is no longer maintained and a new method to enhance productivity.
Let me walk through the steps I followed to migrate from wbthomason/packer.nvim to folke/lazy.nvim and from fatih/go-vim to ray-x/go.nvim, among other improvements I made to speed up my workflow and become more efficient.
Using my configuration
My GitHub repo includes the up-to-date configuration I described in this post. To start using it, copy the files to your Neovim configuration folder. To know where your configuration folder is, run the following command in Neovim:
:echo stdpath("config")
You can start using it immediately after that, but please read the lazy documentation to understand how to manage those plugins, and make sure you read my README.md because you must install some extra packages to take full advantage of this configuration.
Configuration file structure
Everything starts with the init.lua file located in the root folder; Neovim loads this file automatically when it’s opened and serves as our configuration’s entry point because it automatically requires:
"mario.default": loadinglua/mario/default.lua, which defines the default configuration applicable to all buffers and specific file types and"mario.lazy": loadinglua/mario/lazy.lua, which installslazyif it doesn’t exist and initializes it to set up the plugins I’ll describe later in this post.
Before getting into specifics, let’s talk about why lazy.
Why stop using packer?
As of August 2023, packer is no longer maintained, which prompted me to look for an alternative: lazy. Migrating to lazy from packer is straightforward because the configuration is similar. However, I also wanted to take this time to explore new options. The final goal was to replace packer and vimscript-based plugins with LUA-based ones to transition everything slowly to LUA.
Installing lazy
In lua/mario/lazy.lua, you can see the instructions to install lazy:
1local lazypath = vim.fn.stdpath("data") .. "/lazy/lazy.nvim"
2if not vim.loop.fs_stat(lazypath) then
3    vim.fn.system({
4        "git", "clone", "--filter=blob:none",
5        "https://github.com/folke/lazy.nvim.git", "--branch=stable", -- latest stable release
6        lazypath
7    })
8end
9vim.opt.rtp:prepend(lazypath)
The instructions above will use git to clone the folke/lazy.nvim repository using the latest stable branch.
What comes next is the meat of this post: configuring the plugins.
11require("lazy").setup({{import = "mario.plugins"}}, {
12    checker = {
13        enabled = false -- disable check for plugin updates
14    },
15    change_detection = {
16        enabled = false -- disable check for config file changes
17    }
18})
The configuration above indicates that all LUA files in lua/mario/lazy/plugins/ will be imported. Each file represents at least one or a group of plugins describing a feature in Neovim.
Let’s start from the ground up.
Plugins
The order in which I present you the plugins I use indicates how complicated the plugin is to set up; this means the knowledge you need to configure them to do the things you want. For the most part, I keep things pragmatic because I want something that works out of the box, and unless necessary, I would modify it to satisfy my preferences.
So, if you see extra configuration defined as part of the plugin, it was either because the defaults didn’t have the configuration I needed to become more productive or because the defaults didn’t align with what I’m used to. Either way, use my configuration as a reference, play with it, and create the one that works better for you.
Filetype plugin for CSV files
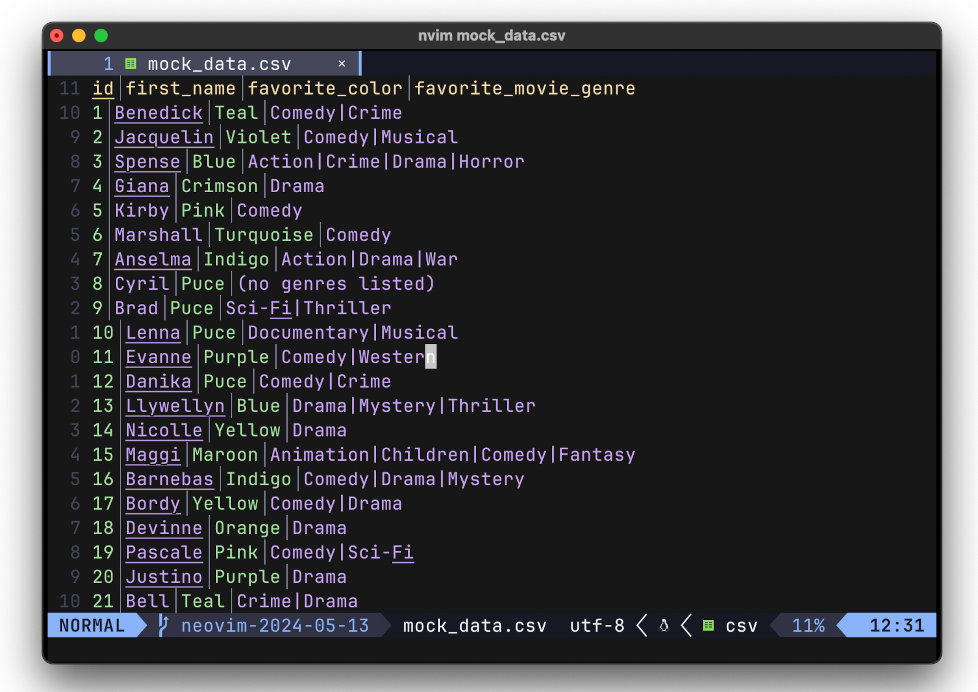
chrisbra/csv.vim is one of the two vimscript-based plugins I use. I am still looking for an alternative written in LUA, and it’s not like I work daily with CSV files, so for now, I’m ok with it. Although this is a powerful plugin, I only wanted the basics, allowing me to see each column organized in the CSV quickly. Please refer to the documentation; it does a lot of things.
The configuration for this plugin is pretty straightforward. I use the default values:
1return {"chrisbra/csv.vim", enabled = true}
It looks like this:
Plugin for clang-format
rhysd/vim-clang-format is a tool for formatting multiple C-based languages. Think of go fmt for C, C++, etc. I use this plugin mainly for Protocol Buffers. It’s the second vimscript plugin I use. The configuration is:
1return {
2    "rhysd/vim-clang-format",
3    init = function()
4        vim.cmd([[
5autocmd FileType proto ClangFormatAutoEnable
6]])
7    end
8}
For this plugin to work, you must install clang-format. If you use HomeBrew run the following:
$ brew install clang-format
It looks like this:

Tabline plugin
romgrk/barbar.nvim is a plugin for efficiently managing tabs. It includes what you would expect: icons representing the file type, git status indicators, numbers, sorting options, and ways to pin tabs, to name a few features.
The best experience is using a Nerd Font, typically a patched font that supports icons. My favorite one is JetBrains Mono.
This plugin requires a bit of configuration; the basics start with adding a dependency to two plugins that let you display gitsigns and use that patched font I mentioned before:
1    "romgrk/barbar.nvim",
2    dependencies = {
3        "nvim-tree/nvim-web-devicons", -- patched fonts support
4        "lewis6991/gitsigns.nvim" -- display git status
5    },
Next, in the config, I set up the values I prefer:
12 local barbar = require("barbar")
13
14 barbar.setup({
15 clickable = true, -- Enables/disables clickable tabs
16 tabpages = false, -- Enable/disables current/total tabpages indicator (top right corner)
17 insert_at_end = true,
18 icons = {
19 button = "",
20 buffer_index = true,
21 filetype = {enabled = true},
22 visible = {modified = {buffer_number = false}},
23 gitsigns = {
24 added = {enabled = true, icon = "+"},
25 changed = {enabled = true, icon = "~"},
26 deleted = {enabled = true, icon = "-"}
27 }
28 }
29 })
My configuration, in this case, covers clickable tabs, displaying an icon to close the tab, a number that would be useful with the keymaps I’ll cover below, as well as indicators related to git status. You can also drag tabs around with your mouse.
Finally, the keymaps:
30        local map = vim.api.nvim_set_keymap
31        local opts = {noremap = true, silent = true}
32
33        -- Move to previous/next
34        map("n", "<A-,>", "<Cmd>BufferPrevious<CR>", opts)
35        map("n", "<A-.>", "<Cmd>BufferNext<CR>", opts)
36        -- Re-order to previous/next
37        map("n", "<A-<>", "<Cmd>BufferMovePrevious<CR>", opts)
38        map("n", "<A->>", "<Cmd>BufferMoveNext<CR>", opts)
39        -- Goto buffer in position...
40        map("n", "<A-1>", "<Cmd>BufferGoto 1<CR>", opts)
41        map("n", "<A-2>", "<Cmd>BufferGoto 2<CR>", opts)
42        map("n", "<A-3>", "<Cmd>BufferGoto 3<CR>", opts)
43        map("n", "<A-4>", "<Cmd>BufferGoto 4<CR>", opts)
44        map("n", "<A-5>", "<Cmd>BufferGoto 5<CR>", opts)
45        map("n", "<A-6>", "<Cmd>BufferGoto 6<CR>", opts)
46        map("n", "<A-7>", "<Cmd>BufferGoto 7<CR>", opts)
47        map("n", "<A-8>", "<Cmd>BufferGoto 8<CR>", opts)
48        map("n", "<A-9>", "<Cmd>BufferGoto 9<CR>", opts)
49        map("n", "<A-0>", "<Cmd>BufferLast<CR>", opts)
50        -- Pin/unpin buffer
51        map("n", "<A-p>", "<Cmd>BufferPin<CR>", opts)
52        -- Close buffer
53        map("n", "<A-c>", "<Cmd>BufferClose<CR>", opts)
54        map("n", "<A-b>", "<Cmd>BufferCloseAllButCurrent<CR>", opts)
They all work in normal mode and use Alt/Option to interact with the tabs, including moving, reordering, going to, pinning/unpinning, and closing.
It looks like this:
Statusline plugin
nvim-lualine/lualine.nvim is a plugin that displays a status line. It also takes advantage of using a Nerd Font, and depends on another plugin I’ll show you later: catppuccin/nvim.
It supports different themes and displays mode, encoding type, file type, git branch, git status, and your typical line number, among other things.
My configuration is as simple as:
1return {
2    "nvim-lualine/lualine.nvim",
3    dependencies = {"nvim-tree/nvim-web-devicons", "catppuccin/nvim"},
4    config = function()
5        require("lualine").setup({options = {theme = "catppuccin"}})
6    end
7}
It looks like this:

Theme plugin
catppuccin/nvim was briefly introduced a while ago as part of the status line plugin. It integrates with most of the plugins I use and provides a soothing theme that nicely blends them together, providing a cohesive experience.
Catppuccin provides different “flavours” that define color profiles; my favorite is mocha with the following configuration:
12            flavour = "mocha",
13            term_colors = true,
14            styles = {
15                conditionals = {},
16                functions = {"italic"},
17                types = {"bold"}
18            },
19            color_overrides = {
20                mocha = {
21                    base = "#171717", -- background
22                    surface2 = "#9A9A9A", -- comments
23                    text = "#F6F6F6"
24                }
25            },
And with the following integrations, some of them I’ll show you later in this post:
37            integrations = {
38                barbar = true,
39                cmp = true,
40                gitsigns = true,
41                native_lsp = {enabled = true},
42                nvimtree = true,
43                telescope = true,
44                treesitter = true,
45                treesitter_context = true
46            }
In a way, you saw how this looks already, but here’s one more time:
Comment plugin
numToStr/Comment.nvim takes advantage of tree-sitter, a plugin I will show you later to comment on nodes found by tree-sitter. Comment supports commenting using blocks or lines.
I use the following configuration:
1return {
2    "numToStr/Comment.nvim",
3    dependencies = {
4		"nvim-treesitter/nvim-treesitter",
5	},
6    config = function() require("Comment").setup() end
7}
Keymaps enabled by default provide some reasonable control when interacting with comments to call out a few of them in normal mode:
gcc: Toggles the current line using linewise comment.gbc: Toggles the current line using blockwise comment .gca}: Toggle around curly brackets.
It looks like this:
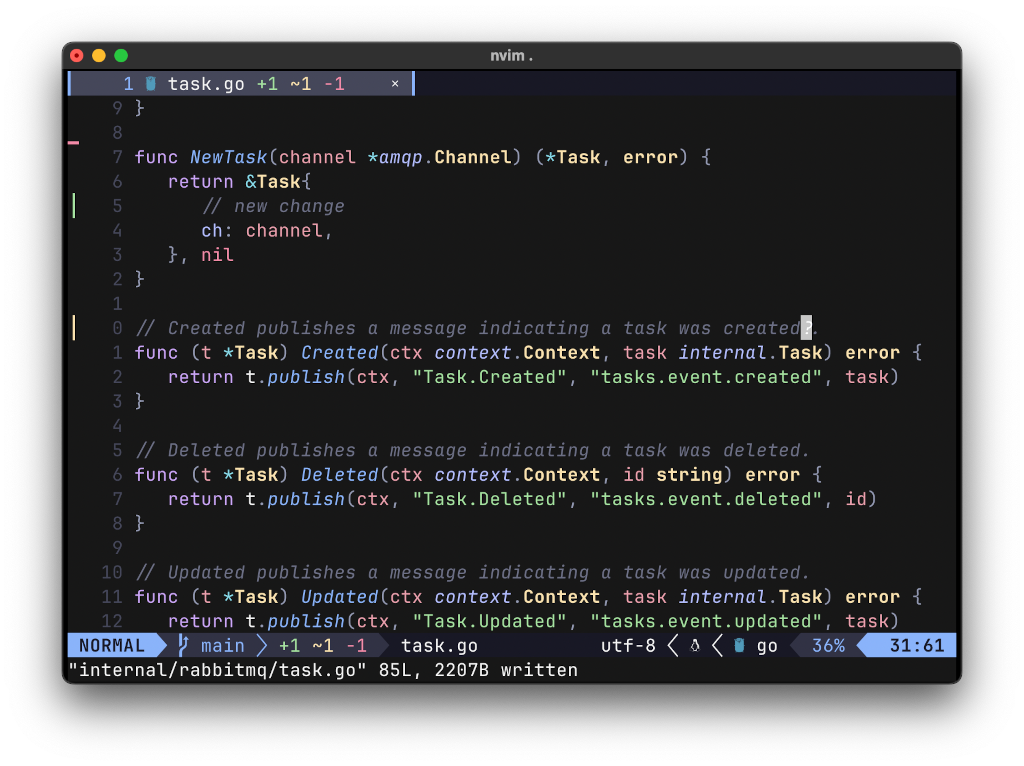
Plugin for git integration for buffers
lewis6991/gitsigns.nvim displays the git status of the opened buffers; this plugin integrates with some of the plugins I showed you. The configuration I use is pretty straightforward:
1return {
2    "lewis6991/gitsigns.nvim",
3    config = function() require("gitsigns").setup() end
4}
You saw it in action before; notice the left bar, the tab bar, and the status line. Here’s how it looks:
Plugin to interact with surrounding delimiter pairs
kylechui/nvim-surround lets you work with surrounding delimiter pairs, typically single quotes, double quotes, parentheses, or tags.
The configuration I use is the following:
 1return {
 2    "kylechui/nvim-surround",
 3    dependencies = {
 4        "nvim-treesitter/nvim-treesitter",
 5        "nvim-treesitter/nvim-treesitter-textobjects"
 6    },
 7    event = "VeryLazy",
 8    version = "2.1.7",
 9    config = function() require("nvim-surround").setup() end
10}
In practice, it looks like this:
Plugins for code completion
This section is the most complicated part of this post so far. It considers adding code completion, configuring a Language Server Protocol (LSP) server, and adding snippets support and visual indicators representing the different completion types.
Using these plugins requires some understanding, so let’s start with the basics:
 2    "hrsh7th/nvim-cmp",
 3    dependencies = {
 4        "hrsh7th/cmp-nvim-lsp", -- cmp_nvim_lsp
 5        "neovim/nvim-lspconfig", -- lspconfig
 6        "onsails/lspkind-nvim", -- lspkind (VS pictograms)
 7        {
 8            "L3MON4D3/LuaSnip",
 9            version = "v2.*",
10            build = "make install_jsregexp",
11            dependencies = {"rafamadriz/friendly-snippets"}, -- Snippets
12            config = function()
13                require("luasnip.loaders.from_vscode").lazy_load()
14                -- https://github.com/rafamadriz/friendly-snippets/blob/main/snippets/go.json
15            end
16        }, {"saadparwaiz1/cmp_luasnip", enabled = true}
17    },
Above, we import the plugin (line 2) and all their dependencies (line 4 to 16); those bring functionality that applies to this feature and others that I’ll describe later.
Let’s break this down, starting with neovim/nvim-lspconfig. This plugin sets the configuration needed for the LSP servers to use. If you use different programming languages or have a concrete configuration, you must refer to this plugin to turn on/off your current language.
Next, we have onsails/lspkind-nvim. This plugin adds pictograms anywhere a completion menu appears. The default symbols work for me, but you can change them if you want to.
After that, we have the snippets plugin L3MON4D3/LuaSnip, which, together with rafamadriz/friendly-snippets, lets you create shortcuts for snippets. It supports many languages and is often updated. Please review the friendly-snippets repository to learn what snippets apply to your file types.
All of those look like this:
The following section describes the concrete configurations for those plugins. This section is where it gets interesting because those are my preferences, and you must review the configuration of each plugin to adapt it to your preferences.
Let’s start with L3MON4D3/LuaSnip. The following configuration allows you to display a character (⇥) that indicates more nodes are available when a snippet (or auto-completion) is triggered; this visual indicator reminds you when more options are available when auto-completion is displayed. In practice, I use it to know when to continue pressing TAB to edit values that must come afterward; you can see it in action above as well.
23        luasnip.config.setup({
24            ext_opts = {
25                [types.choiceNode] = {
26                    active = {virt_text = {{"⇥", "GruvboxRed"}}}
27                },
28                [types.insertNode] = {
29                    active = {virt_text = {{"⇥", "GruvboxBlue"}}}
30                }
31            }
32        })
Next, we have a wall of text used to indicate the configuration for auto-completion, it defines things such as keymaps for scrolling up and down, as well as the configuration used by onsails/lspkind-nvim:
37        cmp.setup({
38            snippet = {
39                expand = function(args)
40                    luasnip.lsp_expand(args.body)
41                end
42            },
43            window = {
44                completion = cmp.config.window.bordered(),
45                documentation = cmp.config.window.bordered()
46            },
47            mapping = cmp.mapping.preset.insert({
48                ["<C-b>"] = cmp.mapping.scroll_docs(-4),
49                ["<C-f>"] = cmp.mapping.scroll_docs(4),
50                ["<C-Space>"] = cmp.mapping.complete(),
51                ["<C-e>"] = cmp.mapping.abort(),
52                ["<CR>"] = cmp.mapping.confirm({select = true}),
53                ["<Tab>"] = cmp.mapping(function(fallback)
54                    if cmp.visible() then
55                        cmp.select_next_item()
56                    elseif luasnip.locally_jumpable(1) then
57                        luasnip.jump(1)
58                    else
59                        fallback()
60                    end
61                end, {"i", "s"})
62            }),
63            sources = cmp.config.sources({
64                {name = "nvim_lsp"}, {name = "luasnip"}, {name = "buffer"}
65            }),
66            formatting = {
67                format = lspkind.cmp_format({
68                    mode = "symbol_text",
69                    maxwidth = 70,
70                    show_labelDetails = true
71                })
72            }
73        })
Finally, we have a section to configure settings applicable to the programming languages I use; in my case, for all the languages I have I use whatever neovim/nvim-lspconfig provides by default. You should add configurations that apply your de facto programming languages here. Also, remember that you may need to install LSP servers to make everything work properly.
75        local lspconfig = require("lspconfig")
76
77        -- All languages: https://github.com/neovim/nvim-lspconfig/blob/master/doc/server_configurations.md
78
79        -- Default lspconfig values for Go are set by `navigator`
80        -- Go: go install golang.org/x/tools/gopls@latest
81
82        -- Python: brew install pyright
83        lspconfig["pyright"].setup {}
84
85        -- Ruby: gem install solargraph
86        lspconfig["solargraph"].setup {}
87
88        -- https://phpactor.readthedocs.io/en/master/usage/standalone.html#installation
89        lspconfig["phpactor"].setup {}
Plugins for working with language syntax trees
Tree-sitter is a source code parser that lets us work with concrete syntax trees. nvim-treesitter/nvim-treesitter is the plugin that interfaces with tree-sitter, and thanks to nvim-treesitter/nvim-treesitter-textobjects, we can use the typical Neovim motions to work with those syntax trees, for example, deleting a function or copying a block of code.
The configuration I use for nvim-treesitter is:
 2    "nvim-treesitter/nvim-treesitter",
 3    tag = "v0.9.2",
 4    build = ":TSUpdate",
 5    dependencies = {
 6        {"nvim-treesitter/nvim-treesitter-textobjects"}, -- Syntax aware text-objects
 7        {
 8            "nvim-treesitter/nvim-treesitter-context", -- Show code context
 9            opts = {
10                enable = true,
11                mode = "topline",
12                line_numbers = true
13            }
14        }
15    },
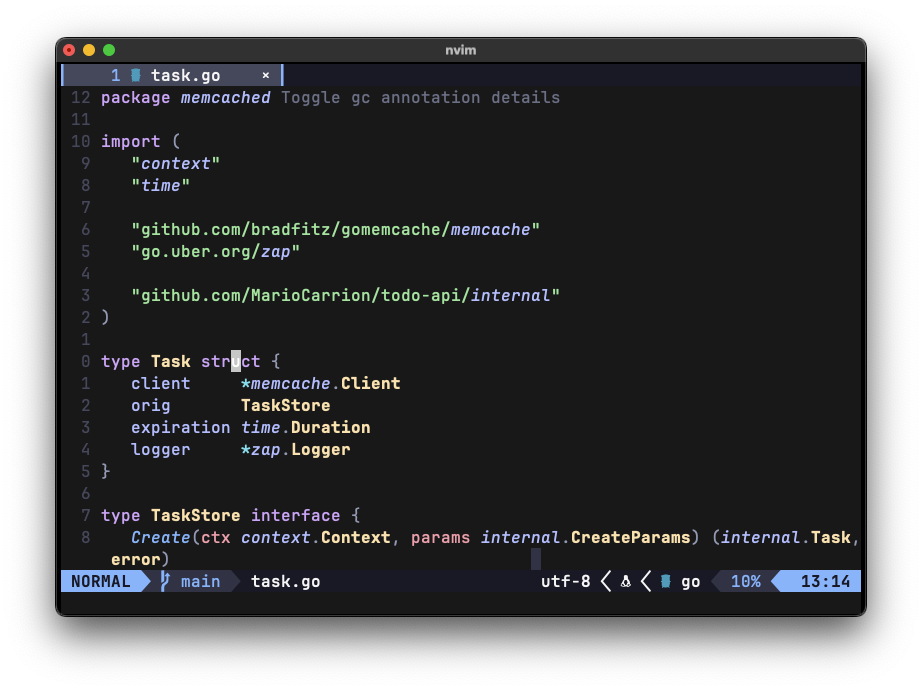
It’s worth calling out nvim-treesitter/nvim-treesitter-context which displays a line indicating the context relative to the block of the code; here’s all of them working in action:
Finally, the configuration I use for all of them is:
23        treesitter.setup({
24            ensure_installed = {
25                "csv", "dockerfile", "gitignore", "go", "gomod", "gosum",
26                "gowork", "javascript", "json", "lua", "markdown", "proto",
27                "python", "rego", "ruby", "sql", "svelte", "yaml", "php"
28            },
29            indent = {enable = true},
30            auto_install = true,
31            sync_install = false,
32            highlight = {
33                enable = true,
34                disable = {"csv"} -- preferring chrisbra/csv.vim
35            },
36            textobjects = {select = {enable = true, lookahead = true}}
37        })
I’m turning off the CSV parser because I prefer chrisbra/csv.vim, which I mentioned at the beginning of the post.
Plugins for fuzzy finding and interacting with files
nvim-telescope/telescope.nvim is a fuzzy finder over lists. Combined with features provided by other plugins that I will describe later, it allows us to search language trees, files, and spelling suggestions.
The configuration I use is:
 2    "nvim-telescope/telescope.nvim",
 3    dependencies = {
 4        "nvim-lua/plenary.nvim",
 5        {
 6            "nvim-telescope/telescope-fzf-native.nvim",
 7            build = "make",
 8            enabled = true
 9        }, {"nvim-telescope/telescope-file-browser.nvim", enabled = true}
10    },
Make sure you install fd to take advantage of faster file searches:
$ brew install fd
Next is the setup I use to set some mappings to move when the telescope list displays and to enable the file browser:
16        telescope.setup({
17            defaults = {
18                sorting_strategy = "ascending",
19                layout_strategy = "horizontal",
20                layout_config = {prompt_position = "top"},
21                mappings = {
22                    i = {
23                        ["<C-k>"] = actions.move_selection_previous, -- move to prev result
24                        ["<C-j>"] = actions.move_selection_next, -- move to next result
25                        ["<C-q>"] = actions.send_selected_to_qflist +
26                            actions.open_qflist -- send selected to quickfixlist
27                    }
28                }
29            },
30            extensions = {
31                file_browser = {
32                    path = "%:p:h", -- open from within the folder of your current buffer
33                    display_stat = false, -- don't show file stat
34                    grouped = true, -- group initial sorting by directories and then files
35                    hidden = true, -- show hidden files
36                    hide_parent_dir = true, -- hide `../` in the file browser
37                    hijack_netrw = true, -- use telescope file browser when opening directory paths
38                    prompt_path = true, -- show the current relative path from cwd as the prompt prefix
39                    use_fd = true -- use `fd` instead of plenary, make sure to install `fd`
40                }
41            }
42        })
Finally, the last part of this setup loads the extensions for fuzzy searching and nvim-telescope/telescope-file-browser.nvim (the file browser) and defines the keymaps I use to search files, display the tree-sitter symbols, and suggest spelling changes.
44        telescope.load_extension("fzf")
45        telescope.load_extension("file_browser")
46
47        local builtin = require("telescope.builtin")
48
49        -- key maps
50
51        local map = vim.keymap.set
52        local opts = {noremap = true, silent = true}
53
54        map("n", "-", ":Telescope file_browser<CR>")
55
56        map("n", "<leader>ff", builtin.find_files, opts) -- Lists files in your current working directory, respects .gitignore
57        map("n", "<leader>fx", builtin.treesitter, opts) -- Lists tree-sitter symbols
58        map("n", "<leader>fs", builtin.spell_suggest, opts) -- Lists spell options
In practice, all of this looks looks like this:

Plugins for code analysis and navigation
Finally! Let’s talk about the last set of plugins that I use for my daily software development, starting with the one orchestrating everything else. ray-x/navigator.lua uses some of the plugins I mentioned before, like the ones for code completion, language syntax trees, and the one for Go, which I mentioned when I started this post: ray-x/go.nvim.
The initial setup looks like this:
 2    "ray-x/navigator.lua",
 3    dependencies = {
 4        {"hrsh7th/nvim-cmp"}, {"nvim-treesitter/nvim-treesitter"},
 5        {"ray-x/guihua.lua", run = "cd lua/fzy && make"}, {
 6            "ray-x/go.nvim",
 7            event = {"CmdlineEnter"},
 8            ft = {"go", "gomod"},
 9            build = ':lua require("go.install").update_all_sync()'
10        }, {
11            "ray-x/lsp_signature.nvim", -- Show function signature when you type
12            event = "VeryLazy",
13            config = function() require("lsp_signature").setup() end
14        }
15    },
The setup above brings the dependencies I mentioned before and two new ones: nvim, which handles everything related to Go, and ray-x/lsp_signature.nvim, which displays the LSP documentation as you type.
Configuring all of that is done in the setup:
17        require("go").setup()
18        require("navigator").setup({
19            lsp_signature_help = true, -- enable ray-x/lsp_signature
20            lsp = {format_on_save = true}
21        })
22
23        vim.api.nvim_create_autocmd("FileType", {
24            pattern = {"go"},
25            callback = function(ev)
26                -- CTRL/control keymaps
27                vim.api
28                    .nvim_buf_set_keymap(0, "n", "<C-i>", ":GoImport<CR>", {})
29                vim.api.nvim_buf_set_keymap(0, "n", "<C-b>", ":GoBuild %:h<CR>",
30                                            {})
31                vim.api.nvim_buf_set_keymap(0, "n", "<C-t>", ":GoTestPkg<CR>",
32                                            {})
33                vim.api.nvim_buf_set_keymap(0, "n", "<C-c>",
34                                            ":GoCoverage -p<CR>", {})
35
36                -- Opens test files
37                vim.api.nvim_buf_set_keymap(0, "n", "A",
38                                            ":lua require('go.alternate').switch(true, '')<CR>",
39                                            {}) -- Test
40                vim.api.nvim_buf_set_keymap(0, "n", "V",
41                                            ":lua require('go.alternate').switch(true, 'vsplit')<CR>",
42                                            {}) -- Test Vertical
43                vim.api.nvim_buf_set_keymap(0, "n", "S",
44                                            ":lua require('go.alternate').switch(true, 'split')<CR>",
45                                            {}) -- Test Split
46            end,
47            group = vim.api.nvim_create_augroup("go_autocommands",
48                                                {clear = true})
49        })
The setup above adds some keymaps to call goimports, go build, go test, and go test with code coverage, as well as options to open the test files in a new tab, in a vertical and horizontal split.
The ray-x/go.nvim README.md includes more commands you could map to your preferences, so please look at them.
What’s interesting about this setup is the default keymaps included in the navigator. There are many of them, and the list is long, but this takes full advantage of the LSP server, tree-sitter, and all the options that come with them.
Here are a few examples, all of them in normal mode:
gr: displays the references where a type or variable is used,gW: lets you search symbols in the workplace,gi: over an interface type name displays the types implementing that interface,gP: over a non-function/method types, it displays the preview of the implementation,gp: over any function/method types, it displays the preview of the implementation,K: displays documentation.
In practice, it looks like this:
Conclusion
And that’s it! I’m glad you reached this point in the post. I hope the configuration and examples I showed you make you a more productive software developer. As a final reminder, please review the projects’ README; they provide more than what I showed you here.
Recommended reading
If you’re looking to sink your teeth into more Go/Vim/Neovim-related topics I recommend the following links:
- Post: Neovim configuration (2022)
- Post: Neovim configuration (2020)
- Book: Mastering Vim Quickly: From WTF to OMG in no time
- Book: Modern Vim: Craft Your Development Environment with Vim 8 and Neovim
- Book: Practical Vim: Edit Text at the Speed of Thought